How to Create a Repeater Field in Gravity Forms
Gravity Forms is one of the most powerful form builders for WordPress, but it’s missing one thing out of the box: repeatable field groups. Think order forms where users need to add multiple items, event registrations with multiple attendees, or job applications with multiple work experiences.
That’s exactly what GF Repeater solves. In this guide, you’ll learn how to add a repeater field to any Gravity Form in under 5 minutes.
What Is a Repeater Field?
A repeater field is a group of form fields that users can dynamically add and remove on the frontend. Instead of building a form with a fixed number of rows (Item 1, Item 2, Item 3…), you let the user decide how many they need.
For example:
- Order form: Product name, quantity, size — add as many items as needed
- Event registration: Attendee name, email, dietary preference — one set per guest
- Job application: Company, role, dates — one set per position
Step 1: Install GF Repeater
You need Gravity Forms already installed and active.
- Download GF Repeater from gfrepeater.com
- Go to Plugins → Add New → Upload Plugin in your WordPress admin
- Upload the ZIP file and activate
The free version supports 1 repeater group per form with up to 3 rows. Pro unlocks unlimited groups and up to 50 rows.
Step 2: Add Start and End Markers
Open any form in the Gravity Forms editor. GF Repeater adds two new field types: Repeater Start and Repeater End.
- Drag a Repeater Start field onto your form
- Give it a Group Name (e.g., “Items”, “Attendees”, “Employees”)
- Add any standard Gravity Forms fields below it — these become the repeatable fields
- Drag a Repeater End field below the last field in the group
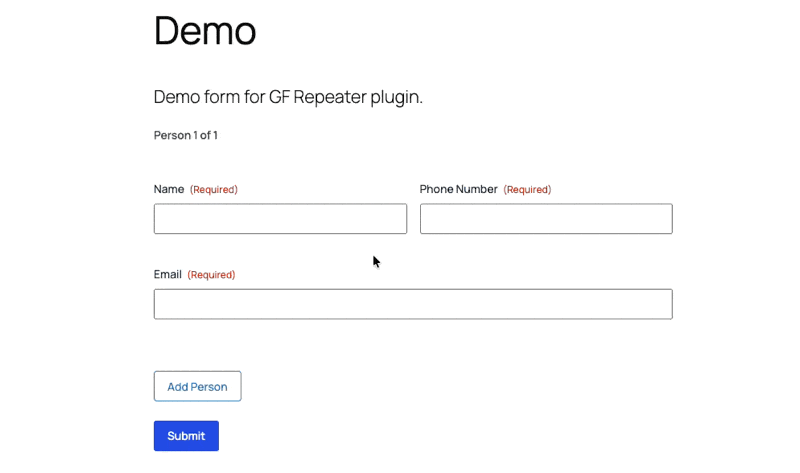
Here’s what it looks like in action:

Your form structure should look like this:
Repeater Start (Group: "Items")
  ├── Product Name (Text)
  ├── Quantity (Number)
  └── Size (Drop Down)
Repeater End
That’s it. Any fields between Start and End become repeatable.
Step 3: Configure Settings
Click the Repeater Start field to access settings:
- Min Rows: The minimum number of rows shown (default: 1)
- Max Rows: The maximum rows a user can add (Free: 3, Pro: up to 50)
- Default Rows: How many rows to show on initial load
- Button Labels: Customize the “Add” and “Remove” button text
Step 4: Preview and Test
Save your form and preview it. You’ll see:
- The first row of fields rendered by default
- An Add button to insert new rows
- A Remove button on each row (except when at minimum)
Users fill in a row, click Add, and get a fresh set of fields. All rows are validated server-side — the same validation rules you set on the original fields apply to every row.
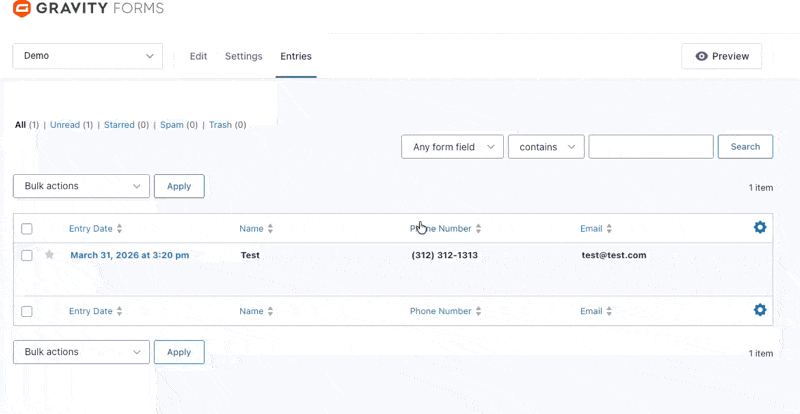
What Happens to the Data?
All repeater data is saved to Gravity Forms entries:
- Row 0 is stored natively by Gravity Forms (shows up everywhere GF expects)
- Extra rows are stored as entry meta and displayed in the admin entry detail view
- Email notifications automatically include all rows via the
{gfr_rows:groupname}merge tag - CSV export includes extra rows as additional columns (Pro)
- REST API exposes all rows programmatically (Pro)
No data is lost. Everything integrates with Gravity Forms’ existing systems.
Going Further with Pro
The free version covers the basics. GF Repeater Pro adds:
- Unlimited repeater groups per form
- Up to 50 rows per group
- Conditional logic inside rows — show/hide fields based on values within the same row
- Row calculations — sum, average, count, min, max across all rows
- File uploads in repeater rows
- Copy row — duplicate a filled row with one click
- Drag-reorder — let users rearrange rows
- Collapse/expand — keep long forms manageable
- Row numbering — display row numbers automatically
- Conditional row limits — set max rows based on another field’s value
- CSV export and REST API — full data access
View pricing and get started →
Common Questions
Does it work with multi-page forms? Yes. The Start and End markers just need to be on the same page.
What field types are supported? All standard Gravity Forms fields: Text, Number, Email, Phone, Website, Drop Down, Checkboxes, Radio Buttons, Name, Address, Date, Time, Hidden, Section Break, and File Upload (Pro).
Does it work with my theme? GF Repeater inherits Gravity Forms’ styling. If your theme supports GF, it supports GF Repeater.
Can I style the repeater rows? Yes. Each row has CSS classes and data attributes for custom styling. See the styling guide.
Get Started
Pro Edition
Unlimited groups, 50 rows, conditional logic, calculations, file uploads, and more.
View Pricing